Getting started
This document explains how to get started with the chat application and explain some concepts. If you ever need help you can make a post on our subreddit.
TIP
There's now an official Youtube Tutorial playlist which is recommended! It will simply the setup massively.
WARNING
Always stop the server before editing the config.json file. Data may be overwritten otherwise!
Requirements & Recommendations
The software was designed to be setup and run as simple as possible. Using the config.json file you can manage additional settings that are not present in the web client. For example you could configurate a SQL server compatible with MariaDB to improve overall functionality and unlock all the features.
| Feature | Description |
|---|---|
| NodeJS / Bun | In case your machine cant run bun you can also use NodeJS |
| MariaDB | Required. MySQL IS NOT COMPATIBLE |
| SSL / TLS Cert | You will need a certificate if you try to access it from another machine/internet due to security reasons! |
| LiveKit | Used for voice chatting and screen sharing |
| Caddy/nginx | Used for reverse proxies to make life easier. |
TIP
If you want to follow this tutorial make sure the following is installed:
apt install curl
apt install unzip
Downloading DCTS
You can download and install different versions of DCTS based on your needs. How to best pick a version is explained in the repo Readme.md file.
# Download beta version from github
wget https://github.com/hackthedev/dcts-shipping/archive/refs/heads/beta.zip -O dcts.zip

# unzip it
unzip dcts.zip

# move the unzipped files into the current directory
mv dcts-shipping-beta/* .
mv dcts-shipping-beta/.* . 2>/dev/null

# delete the old one
rm -rf dcts-shipping-beta dcts.zip
Installing Bun
Bun has several install methods on their website. You can choose one of the following install methods below.
# maxOS and Linux
curl -fsSL https://bun.com/install | bash

# windows
powershell -c "irm bun.sh/install.ps1|iex"

# via NodeJS' package manager
npm install -g bun
TIP
If you're using old hardware or an otherwise unsupported system or run into weird bun specific issues you can install NodeJS as fallback.
Running DCTS
The chat app was made to be very easy to setup and use. Out of the box it should work without any issues. To start the server on both Windows and Linux, navigate to the app's root directory using a terminal and start the server using bun .
Example:
# navigate to the project directory
cd /path/to/dcts

# install all packages, only required on initial setup
bun i

# start the server
bun .
As you can see all you really need is one command to launch the chat app if the requirements are already installed. This was made with the goal to be very user friendly and easy to setup and use.
Its possible to use more advanced and better starting methods, such as using docker, a sytem service or supervisor and screen. Information about these can be found in the other documents.
IMPORTANT
Its important that we launch the server briefly so that the configs/config.json file is automatically generated. The server should automatically terminate itself. If not you can press CTRL + C to terminate it.
If successful it should tell you to edit the config.json file now which we will do in the next step.
TIP
You can run the server with NodeJS as fallback by using the following commands if NodeJS was installed:
# install packages
npm i

# run the server
node .
Database Config
TIP
You can install MariaDB on linux using apt install mariadb-server mariadb-client -y. For windows and testing only you can use XAMPP
IMPORTANT
A MariaDB compatible database connection is required for DCTS to work.
If you have successfully setup a database server you will need to edit the sql section inside the config.json file. You must set enabled to true if thats not the case yet and enter the other information as seen in the example screenshot below. Keep in mind your credentials may be different.
"sql": {
	"enabled": true,
	"host": "127.0.0.1",
	"username": "username",
	"password": "password",
	"database": "dcts",
	"connectionLimit": 10,
	"port": 3306
}
TIP
If you use a database user that has enough permissions DCTS can create the database for you as well.
The default XAMPP username is root and the password is empty.
Accessing your chat app
TIP
Once you have made these changes and saved the config file you can now try to start the server again. If you get errors you can restart the server once more and if they are gone you're good to go.
On default your chat app will run on the port 2052. The port can be changed inside the config.json file under serverinfo.port. To access the web client you can open a browser and enter http://localhost:2052/ if you're running the chat app locally on your machine.
Of course if you installed and ran the chat app on your server you would need to replace localhost with the server's ip address or domain.
IMPORTANT
For public access you will need a TLS certificate! This is where caddy becomes relevant. If you installed DCTS on another machine you will need to setup caddy/nginx with TLS certs before progressing from this point on. Checkout Caddy Setup.
NOTE
Its possible to setup a reverse proxy to get rid of the port in the url. Please check Reverse Proxy Setup for instructions and carefully read them first!
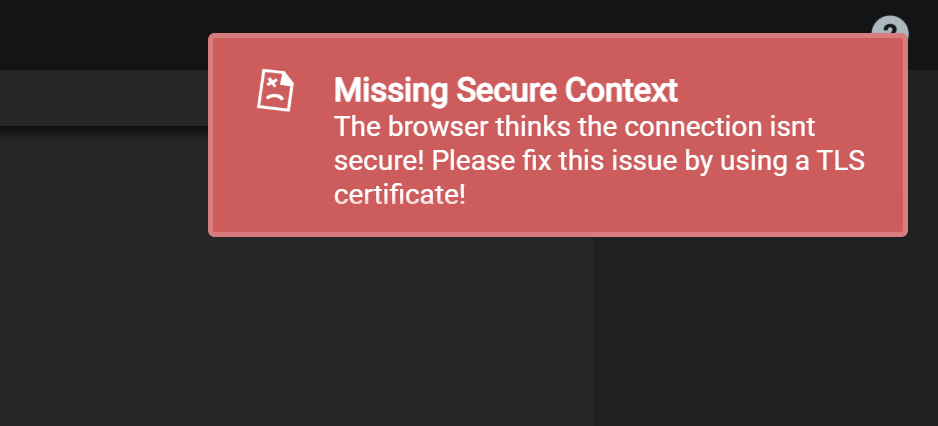
CAUTION
The DCTS web client and desktop client wont work properly if you or anyone will see this message. It means the browser thinks the connection isnt secure and will therefore block important features of the client.
Check the above notice for public access.
Getting Administrator permissions
When you open the chat app for the first time in the web client you will be prompted to register for an account. After that you will notice that you're just a normal member. In the console you can find a Server Admin Token.
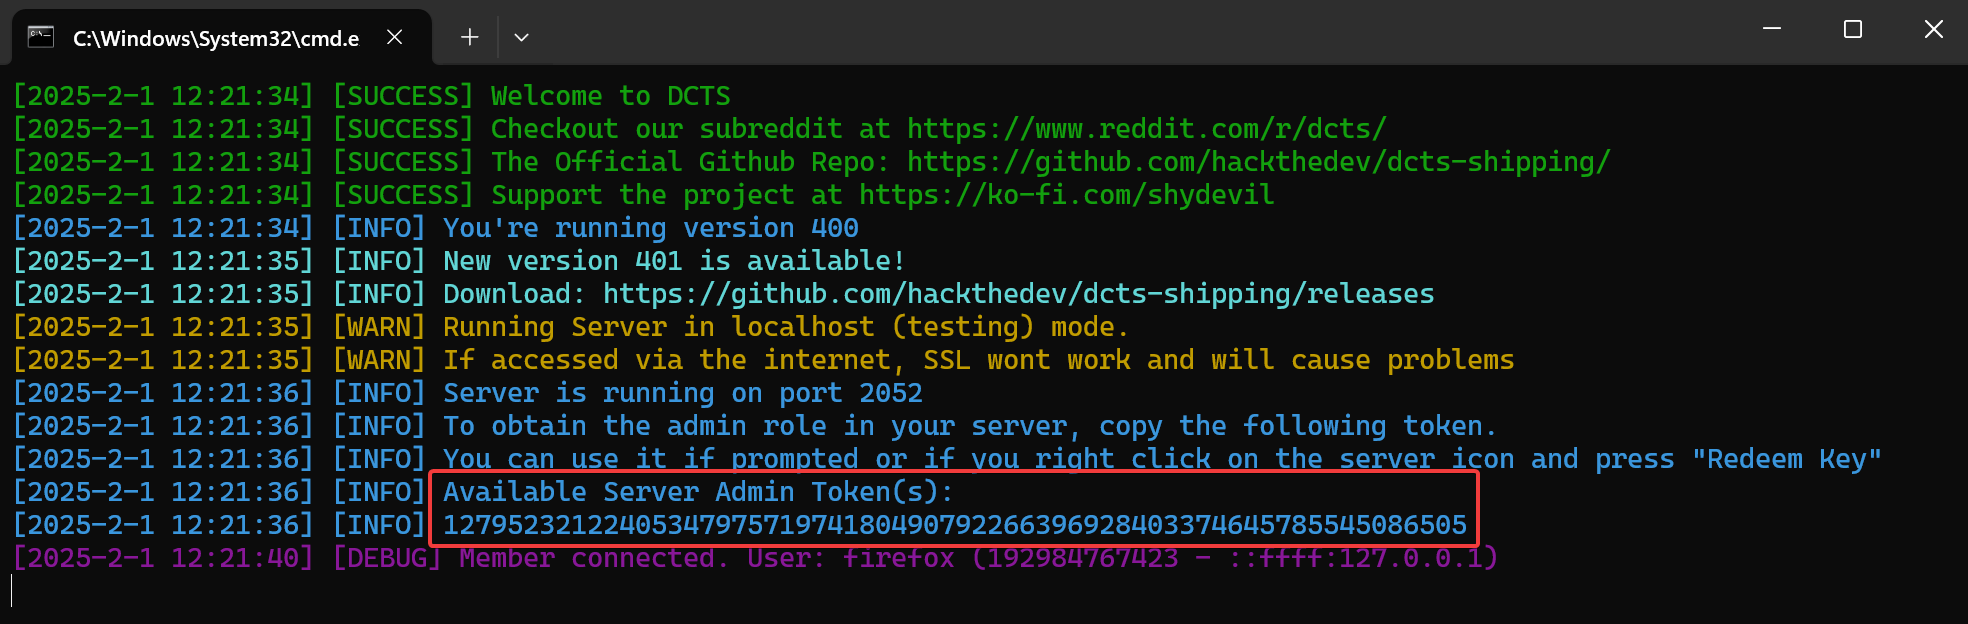
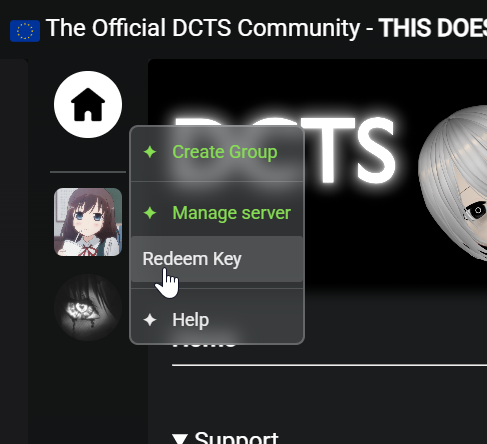
You can use it to redeem the administrator role in the web client. To do so right click any group and click Redeem Key like in the screenshot. After entering the key you will receive the Administrator role.
NOTE
You'll need to configure and install the software needed for Voice Chatting and Screensharing yourself as of right now. Please checkout VoIP Setup.md inside the docs folder. It will also contain a recommended DNS setup.
TIP
You can create a new admin token by typing token 1111 into the DCTS console window, whereas 1111 is the role id, in this case the admin role id.
Going Public
If everything works locally and want to go public now so others can access it too then go checkout Reverse Proxy Setup.
[^testedNodeVersions]: Checkout Github Main Readme "Tested Versions"